With the launch of Windows 10 Operating System, the computer tends to perform much better due to its features and services. Despite having so many features within this version of the OS, sometimes the performance becomes very slow and sluggish. This problem can occur due to the ‘Service Host Superfetch’ feature not working properly.
About the Host Service Superfetch Feature
The introduction of the Superfetch feature was way back during the time of ‘Windows Vista’. The main functionality of this feature is that it checks and helps to improve the overall performance of the computer. The Superfetch feature shows as the “Service Host: Superfetch” under the ‘Processes’ tab of the Windows Task Manager’.
This feature always runs in the background and analyzes the usage pattern of the RAM. It even learns the type of applications that you execute most often. As time goes the Superfetch mark the application that is executed more as ‘frequently used’ and loads them into the RAM prior to its use.
Superfetch is designed basically to fill up all the unused memory space with the preloaded applications. If the system requires more RAM, in order to load an app, then it will vacate some space according to the requirement.
The Prefetch was a feature available with the Windows XP OS, which is basically a preloading memory manager. This feature does not analyze the usage patterns from time to time and changes the preloading parameters of the applications accordingly. Superfetch is the successor of the Prefetch feature.
How can you Deactivate the Superfetch Feature?
Here you will get the various methods to disable the Superfetch feature within the Windows 10 machine.
Turn off the Superfetch from the Services
In order to deactivate the Superfetch feature from the Services, follow the steps below.
- First, tap on the combination of both the keys ‘Windows + R’ together, to open the ‘Run’ dialog box.
- Inside that dialog box, type the following text “services.msc” on the blank area beside the ‘Open:’ label. After that, click on the ‘OK’ button.
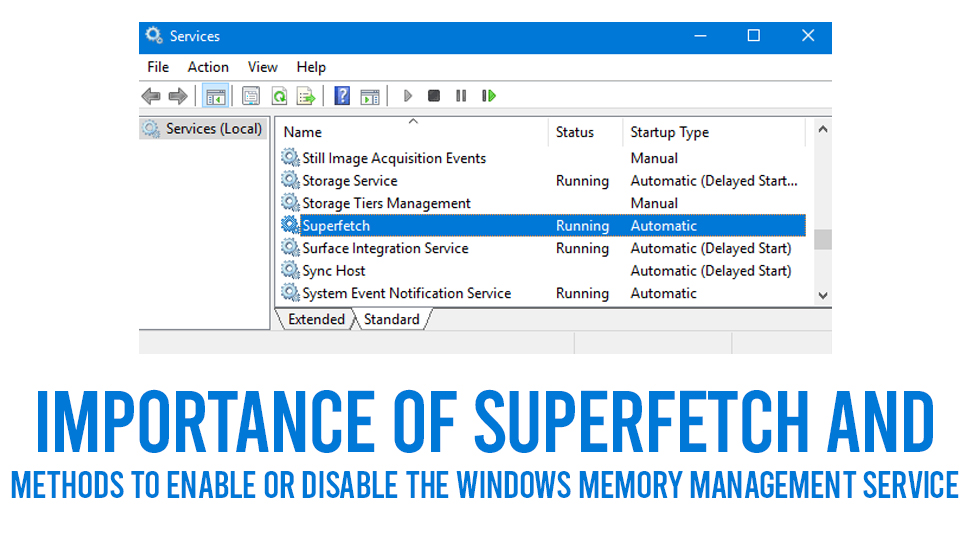
- As soon as you click on that button, then a new window with the title ‘Services’ will come up. Inside this window, you will get a list full of all the services for the installed applications and hardware.
- Now, from that list, locate and choose the ‘Superfetch’ service, then right-click on it. After that, from the popup menu that comes up, find and select the ‘Properties’ option.
- This action will open a new dialog box having the name ‘Superfetch Properties (Local Computer)’ will come up.
- Within that dialog box, under the ‘General’ tab go to the ‘Startup type:’ field and then from the drop-down list select the ‘Disabled’ option.
- After that, click on the ‘Stop’ button and check the result of the ‘Service status:’ as the ‘Stopped’.
- Finally, click on the ‘Apply’ and ‘OK’ respectively.
The second way to Disable Superfetch Feature is using Command Prompt
There will be steps here regarding how to disable the Superfetch feature. So, follow it accordingly.
- First, tap on the ‘Cortana’ logo to open the default search section of the Windows OS.
- Within that section, type the text “command prompt” then from the output page locate the ‘Command Prompt’ option and right-click on it.
- This action will open up a popup list. Now, from that list, click on the ‘Run as administrator’ option.
- As soon as you click on that option, then a new window having the title ‘Command Prompt’ will come up. Inside that window, input the following command – “net.exe stop superfetch” and then press the ‘Enter’ key to execute the same.
- Wait for this command to execute completely. Once the execution is complete, next type in another command- “sc config sysmain start=disabled” and then hit the ‘Enter’ button.
- When the execution process of all the commands is over, next close the ‘Command Prompt’ window.
- At last, restart the computer and see if the computer performs faster or not.
Another way to Deactivate the Superfetch is to use Registry Editor
The final process to deactivate the Superfetch feature is to use the ‘Registry Editor’. Before altering any keys present within the registry take a backup. Follow these steps below, in order to know how can you do it.
- First, tap on both the keys ‘Windows + S’ to launch the search section. In this section type ‘registry editor’, then from search output, click on the ‘Registry Editor’ option.
- Now, if you get the ‘User Account Control’ prompt, then click on the ‘Yes’ button. This action opens a new window having the name ‘Registry Editor’ will come up.
- In that window, go to the left pane and follow the path to get to the ‘Enable Superfetch’ key- “ Computer\HKEY_LOCAL_MACHINE\SYSTEM\CurrentControlSet\Control\Session Manager\Memory Management\PrefetchParameters”.
- Go to the right pane of the window then locate and choose the ‘EnableSuperfetch’ key. After that, right-click on the chosen key and then from the popup menu choose the ‘Modify..’ option.
- As soon as you do that, then a new dialog box having the title ‘Edit DWORD (32-bit) Value’ will come up.
- Inside that dialog box alter the number present within the ‘Value data:’ field to ‘Zero’ and then click on the ‘OK’ button.
- Finally, close the ‘Registry Editor’ and then restart the computer and see whether this issue is present or not.