Here’s a brief introduction to what Surface Pro is. Microsoft’s Surface Pro is known to be a 2-in-1 device that can work both as a laptop as well as a tablet. However, to use this device, you’d have to make it password-protected so that nobody else can intrude in your system without your knowledge.
But oftentimes, we tend to forget our passwords. And during the critical times, there’s not much we can think of doing. But you can still get in without having to use the password. Or it could be that you’d want to factory reset surface pro 4 without a password. So if that is the case, then go through the contents below on how to reset surface pro!
Ways to Factory Reset Microsoft’s Surface Pro without Using Any Password
If you’re willing to go for a hard reset of the system then make sure you opt for the recovery tool to save the data present in the system. This is because once you factory reset, everything that you’ve saved on the system will be removed and will start from its default state. Here are some methods you can apply on factory reset surface pro:
Method 1: Use the Login Screen
As odd as it sounds, you can do the resetting surface pro from the login page itself without having to use any login credentials. But, before you proceed with this step, make sure you have a keyboard attached to the Tablet.
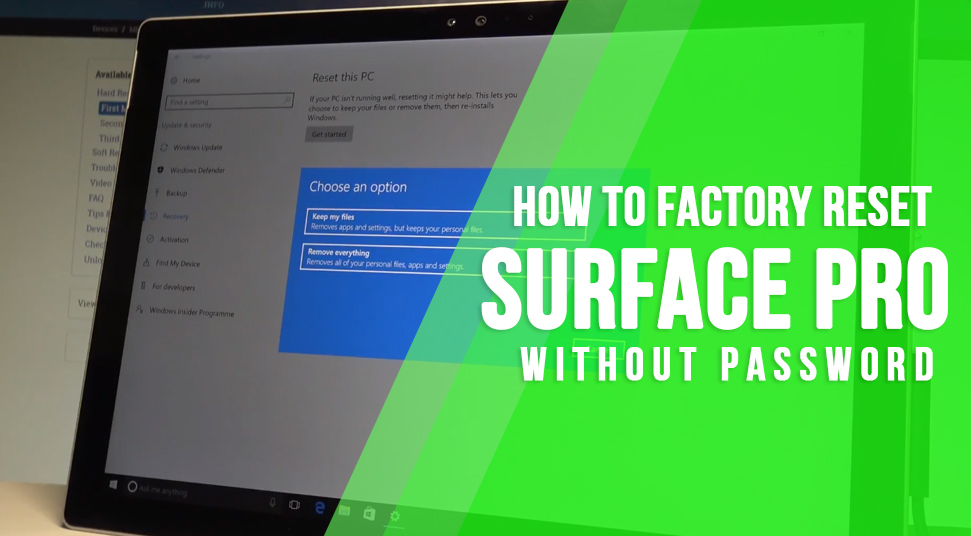
- When you’re at the login page, go to the icon of “Ease of Access” and then click on it. Then, select the option called “On-screen Keyboard”. Now the next thing you need to do is switch on the Surface Pro Tablet.
- After that, press the “Shift” key and hold it, on the login page. Now, when you’ve kept the Shift button on hold, press the “Power” button simultaneously. And then click on the option called “Restart”.
- Now when the system restarts, it will open in recovery mode. Then click on the “Troubleshoot” option. On the “Troubleshoot” page, choose the option called “Reset This PC”. This will reset the entire system and start from the default configurations and settings.
- On the following box, there’ll be two options:
- “Keep My Files”
- “Remove Everything”
- Based on your preference choose either of these two options. If you wish to keep a backup of your files then click on the “Keep my files” option. If you want to start the system afresh, go for the “remove everything” option.
- However, in this case, you don’t have any choice that choose the “Remove Everything” option. This is because if you wish to keep your files then the system will ask you for the password.
- Now, on the following page, you will have two other options. “Remove my files”, “ Clean the drive fully”. If you are planning to give away the system then go for the “Clean the drive fully” option. Otherwise, you can stick to the “Just Remove my files” option.
- One the last thing you need to do is confirm the action that the system is about to take. Then Surface Pro will undergo a factory reset. Wait until the rest has been completed and then you can enter the system.
Method 2: Using Recovery Image
If you want to go forth with this method, what you need to do is have a flash drive. As the system is under lock protection, you need to have a different system to be able to download the Recovery tool. Having the recovery tool, you can use it when you opt for the factory reset through
- At first, go to the official webpage of Microsoft support and from there, choose the surface pro model name as well as the number of Serial key that has been given at the back of the Surface pro.
- After that, click on the button called “Continue”. So that you can download the recovery image tool. Once the download is finished, it will be in the form of ZIP file. Whatever file is in the Zip file, extract them to a location.
- Now the next to do is insert a flash drive into the system and then go to the search bar. Type “Create a Recovery Tool”. Click on the result. In the Recovery window, there will be an option called “Back up the file system to the file driver”. Uncheck that option Then click on the button called “Next”.
- Now you need to choose a method of recovery. Make sure you use the flash drive as a mode and then click on the option called “Next”. Once the recovery driver has been successfully made, you can copy all the content from the extracted folder and place them here in the flash drive.
- Now take the Flash drive out and then connect it to the Surface Pro tablet. Then press the hold the down volume button and along with that, press the power button as well. Now the tablet will boot and you’ll be taken to recovery mode. From here, opt for the language based on your preference, the layout of the keyboard and then finally choose the “troubleshoot” option.
- Now click on the “Recover From A Drive” option. Then select “remove my files” option and let the factory reset begin. Now the system will start afresh.
Method 3: Use a Third-Party Application
If you faced difficulties in using the first two methods then here’s one last thing you can consider doing. You may need to take help from a third-party software program that is built to recover passwords in order to factory reset.
Go to any web browser and look for programs that will recover the password or your device. Download and install the program. Then go through the steps as per the application to retrieve the password.
Conclusion
Now that you have an idea on how to factory reset Surface Pro without having to use any password, get it started immediately!